How to Highlight in Obsidian (and Maximize Your Note-Taking Experience)
Learn how to highlight in Obsidian using Markdown and Web Highlights. Add colors, tags, notes, and one-click export for faster, cleaner notes.

Obsidian is one of the most popular note-taking apps, but if you’ve ever tried to highlight text directly inside it, you probably noticed the options feel limited. Markdown gives you ways to format notes, but there is no simple built-in tool for color highlighting, tags, or organizing highlights across your vault.
That’s where Web Highlights comes in. It is a browser extension and web app that integrates with Obsidian, letting you highlight text from web pages, PDFs, or even your Kindle, and then export those highlights straight into Obsidian. You can tag, add notes, and organize them, turning plain text into something far more useful.
In this guide, we will walk through step-by-step how to highlight in Obsidian using Web Highlights, how to organize and tag those highlights, and how to export them so they actually improve your note-taking workflow.
By the end, you will know exactly how to make your Obsidian vault easier to reference, study, and build on.
Why Highlighting in Obsidian Makes Sense
Highlighting text makes note-taking far easier to manage.
Instead of scanning long notes or full documents, you can jump directly to the main content marked with a highlight color. It improves context, helps you spot key points faster, and makes review sessions more productive.
In Obsidian, this becomes even more powerful because the app is built on markdown formatting syntax. You can mix highlights with other formatting, such as code blocks, numbered lists, or even column headers, to create a structured vault. Combined with search queries and saved searches, highlighted sections are easier to filter and resurface later.
Highlighting also works well with Obsidian’s linking system.
A single cursor position inside a highlighted block can connect to another note, making your reading view more interactive. Features like preview mode, Live Preview, and reading mode give you different ways to view highlights alongside your notes without losing focus on the page content.
On its own, though, Obsidian doesn’t provide rich options like multiple highlight colors, underlines, or colour highlighting based on CSS style, or just simple research. This is where Web Highlights fills the gap. It adds an intuitive highlighting layer that you can export into your vault. You can highlight web pages, PDFs, or even use it with Kindle, then send those annotations into Obsidian for long-term use. The tool also supports Spaced Repetition by resurfacing highlights, so your study sessions don’t just collect notes; they help you actually remember them.
By combining Obsidian’s linking and plugin ecosystem with Web Highlights’ tagging, annotation, and export features, you get a more organized workflow for research, writing, and studying.
2. Setting Up Web Highlights for Obsidian Integration
Before you can highlight in Obsidian, you’ll need to connect it with Web Highlights. The setup only takes a few minutes.
Install the Extension
Start by installing the Web Highlights Chrome extension. Once added, you’ll see the extension icon in your browser toolbar; just pin it. From there, you can highlight web pages, PDFs, or even import content from Kindle or to Capacities.
Create an Account and Sign In
After installation, open the Web Highlights app and create a free account. Signing in syncs your highlights across devices, so you can access them later in Obsidian, whether you’re on desktop or mobile. You can also adjust preferences, like keyboard shortcuts, from your account dashboard.
Enable Obsidian Export
There is no lengthy process of exporting Web Highlights’ annotations to Obsidian. All you need to do is copy the markdown. We will look at this in detail below.
3. How to Highlight Text in Obsidian
One of the first things you’ll notice when working in Obsidian is that there’s no simple built-in way to highlight text. Unlike bold or italics, highlighting feels hidden behind formatting rules that aren’t very user-friendly.
To highlight in Obsidian, you have to type two equal signs on each side of the text. For example: ==this==.
Sometimes you’ll see proper colour highlighting, but in other cases it blends in with the normal text.
Due to this, many people try to fix highlights with custom CSS class tweaks, HTML tags, or even regular expressions inside search queries. However, adding these edits to every note quickly becomes time-consuming. You end up worrying about font colour, line breaks, and whether your formatting syntax will even show the highlight correctly in Light Mode Style versus dark mode.
Without extra setup or third-party tools, Obsidian just treats everything as normal text, making it harder to scan your main content and page content during a review session.
In short, Obsidian does allow highlighting text, but the method feels limited, clunky, and inconsistent. That’s why many users look for easier ways to manage highlighting text without constantly fighting with the user interface or relying on 3rd party plugins.
4. How to Use Web Highlights to Export Highlights in Obsidian
This is where Web Highlights makes a real difference. Instead of fiddling with ==this== or custom CSS class snippets, you can highlight text on web pages or PDFs directly in your browser, then send those highlights into Obsidian in a clean markdown format.
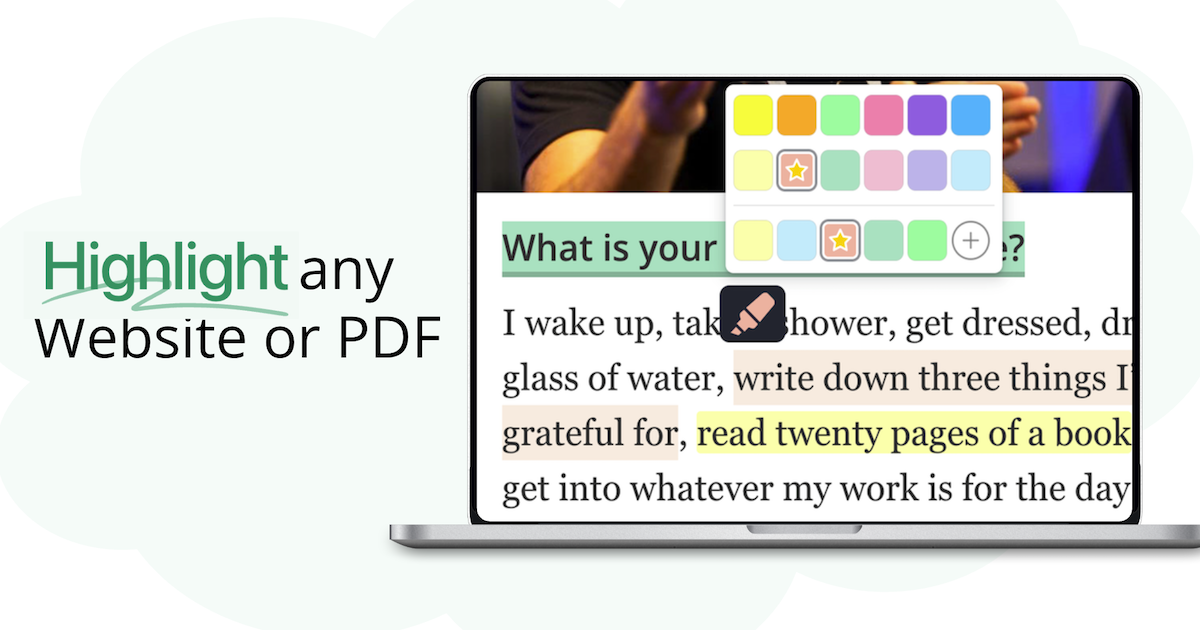
Highlight in Multiple Colors

With Web Highlights, you are not stuck with one highlight color. You can choose different colours to separate ideas, for example, yellow for definitions, blue for examples, or red for questions to revisit later. This kind of colour highlighting makes your review sessions much faster.
Highlighting is really simple, too. You just need to select the text on any webpage and then choose a color to highlight it in.
Annotate with Tags

Every highlight can be tagged inside Web Highlights. When exported, these tags carry over to Obsidian, so you can group highlights by topic, project, or category. Later, you can find them with search queries or even build saved searches for resurfaced highlights.
Add Formatting

Beyond colors and tags, you can format your highlights with headings (H1, H2, H3), bullets, numbered lists, or even a code block for technical notes. This keeps your main content structured when it lands in Obsidian.
Add Notes

Each highlight can include an attached note. Maybe you want to explain why you highlighted a passage, or add a quick reminder for your next review session. These notes sync into Obsidian, appearing right alongside the original page content.
Export Options

Exporting is simple. With one click, you can send your chosen highlights into Obsidian. The export respects your formatting syntax, line breaks, and HTML tags, so what you see in Web Highlights is what you get in your vault.
To export your highlight in obsidian, click on the three dots that appear in your WebHighlights app or on the sidebar that appears when highlighting a webpage.
Then click on the “Copy Markdown” option that appears.
After copying your markdown, go to Obsidian and create a new page. Paste the copied content onto the page, and you should see your highlights, notes, and tags.
This is what highlights look like when pasted in Obsidian:

By combining highlights, tags, notes, and formatting, Web Highlights turns plain text into structured notes that feel natural inside Obsidian.
5. Organizing and Categorizing Your Highlights
Knowing how to highlight in Obsidian is only the first step.
The real value comes when you organize those highlights so they are easy to find and use later. Web Highlights makes this process smoother by exporting content in a way that works well with Obsidian’s structure.
Use Tags for Efficiency
Tags are one of the best ways to keep highlights searchable. For example, you can tag highlights with “Important,” “Definitions,” or “To Review.” In Obsidian, these tags can be pulled up through search queries or saved searches, helping you resurface highlights during a review session. Instead of scrolling through long notes, tags group related page content together, making your research more efficient.
Linking Highlights
One of Obsidian’s strengths is its ability to connect notes.
You can link highlights together by inserting links between related topics. A highlighted definition can connect to a detailed note, while an exported H2 heading can link back to the original web pages where the highlight was made. This creates a connected knowledge base, where each cursor position in your note can lead you to more context.
By tagging, structuring, and linking, you turn basic highlights into a system that works across your research. This is where Web Highlights and Obsidian together move beyond simple colour highlighting and become a tool for long-term knowledge management.
6. Reviewing and Managing Highlights Over Time
Search & filter highlights
Use search queries with tags to pull up the exact snippets you need. Set up saved searches for topics you revisit a lot, so resurfaced highlights show up fast during a review session.
Sync across devices
Web Highlights keeps your annotations in sync, so your Obsidian exports stay consistent on desktop and mobile. This way, how to highlight in Obsidian stays the same everywhere, and the user interface doesn’t get in your way.
Cross-linking highlights
Turn highlights into a web of ideas. In Live Preview, place the cursor position inside a highlighted line and add a link to another note using [[Note Name]]. Do the same for definitions, sources, or follow-ups. In reading view/preview mode, Obsidian shows backlinks automatically so that you can jump between connected notes. Over time, this makes how to highlight in Obsidian more useful because your page is linked, searchable, and easy to revisit during any review session.
Key Takeaways
Highlighting in Obsidian gets much easier with Web Highlights. You get clean color highlights, tags, notes, and one-click export to Markdown. Your notes stay organized, quick to scan, and simple to review across devices.
Ready to try it? Install the extension today.
Frequently Asked Questions
1. How to highlight in Obsidian without the Web Highlights extension?
The basic way for how to highlight text in Obsidian is to wrap text with double equals, like ==this==. It works in Live Preview and reading view, but styling depends on your theme and CSS. If you want multiple colors, tags, and notes with one-click export, use Web Highlights.
2. How do I export Obsidian notes back to Web Highlights?
There isn’t a direct “send back” sync. Use Web Highlights’ Add Content (available in the app) to paste text, a URL, or a PDF so you can open it in reader mode and highlight there. Then export to Obsidian again in clean Markdown.
3. Is Web Highlights available for mobile versions of Obsidian?
Web Highlights is a browser extension and a web app. Your highlights sync to the Web Highlights app. After export, your Obsidian vault handles mobile via your own sync.
4. Can I sync highlights across multiple devices with Web Highlights?
Yes. Sign in to your Web Highlights account to keep highlights in sync. Exported Markdown in Obsidian will follow whatever sync you already use. This keeps your tags, highlight color, and notes consistent on all devices.
5. How do I search for highlighted content in Obsidian?
Open global search (Ctrl+Shift+F / Cmd+Shift+F), enable regex, and run ==.+== to match Markdown highlights. Add filters (tag:, file:, path:, heading:) and save the search. If you export from Web Highlights, filter by tags or headings (H1/H2/H3) for quick resurfacing during a review session.
6. How to Highlight in Obsidian Shortcut?
There’s no native keyboard shortcut to auto-wrap selections. You’ll need to type == around text manually or rely on editor hotkeys/macros. If you want color options without manual edits, highlight in Web Highlights first and export the results to your vault.