Smart Second Brain AI Plugin for Obsidian Notes
Learn how to run AI with the Smart Second Brain plugin for Obsidian. Improve your note-taking by using advanced AI features within your own system.


I wanted to use AI to go through all my local notes without sharing any data with OpenAI or other external services.
Fortunately, I found an easy solution that anyone can use: the Obsidian Smart Second Brain Community Plugin.
Smart Second Brain is a free and open-source Obsidian plugin. It can directly access and process your notes, and it can operate completely offline, ensuring your data remains private and secure.
Here is how to set it up:
1. Install Ollama
Ollama is an open source tool that lets you run large language models like Llama 3, Phi 3, Mistral, Gemma, and others locally on your computer.
ℹ️ You can skip this step if you prefer to use an OpenAI model with your local files. In this case, you’ll need an OpenAI API Key.

Ollama is available for macOS, Linux, and Windows. You can it download it here.
Once installed, Ollama should be running on port 11434. We can confirm that by running curl http://localhost:11434 :

And, more importantly, we can call any of the above mentioned language models by calling ollama run llama3 :

Voila! We have a language model running on our local machine using the llama 3 language model.
If you are using Oh My Zsh, I can recommend putting an alias like this to your ~/.zshrc file. Simply run:
echo 'alias ai="ollama run llama3"' >> ~/.zshrc.
Now, you always have AI ready to serve you in your terminal by typing “ai”.
2. Install the Obsidian Smart Second Brain Plugin
Now that Ollama is running, the next step is to integrate it with Obsidian using the Smart Second Brain plugin. To do that, we need to open the Obsidian settings and go to “Community plugins”.
First of all, make sure to ‘Turn on community plugins’ if you have never used them before:
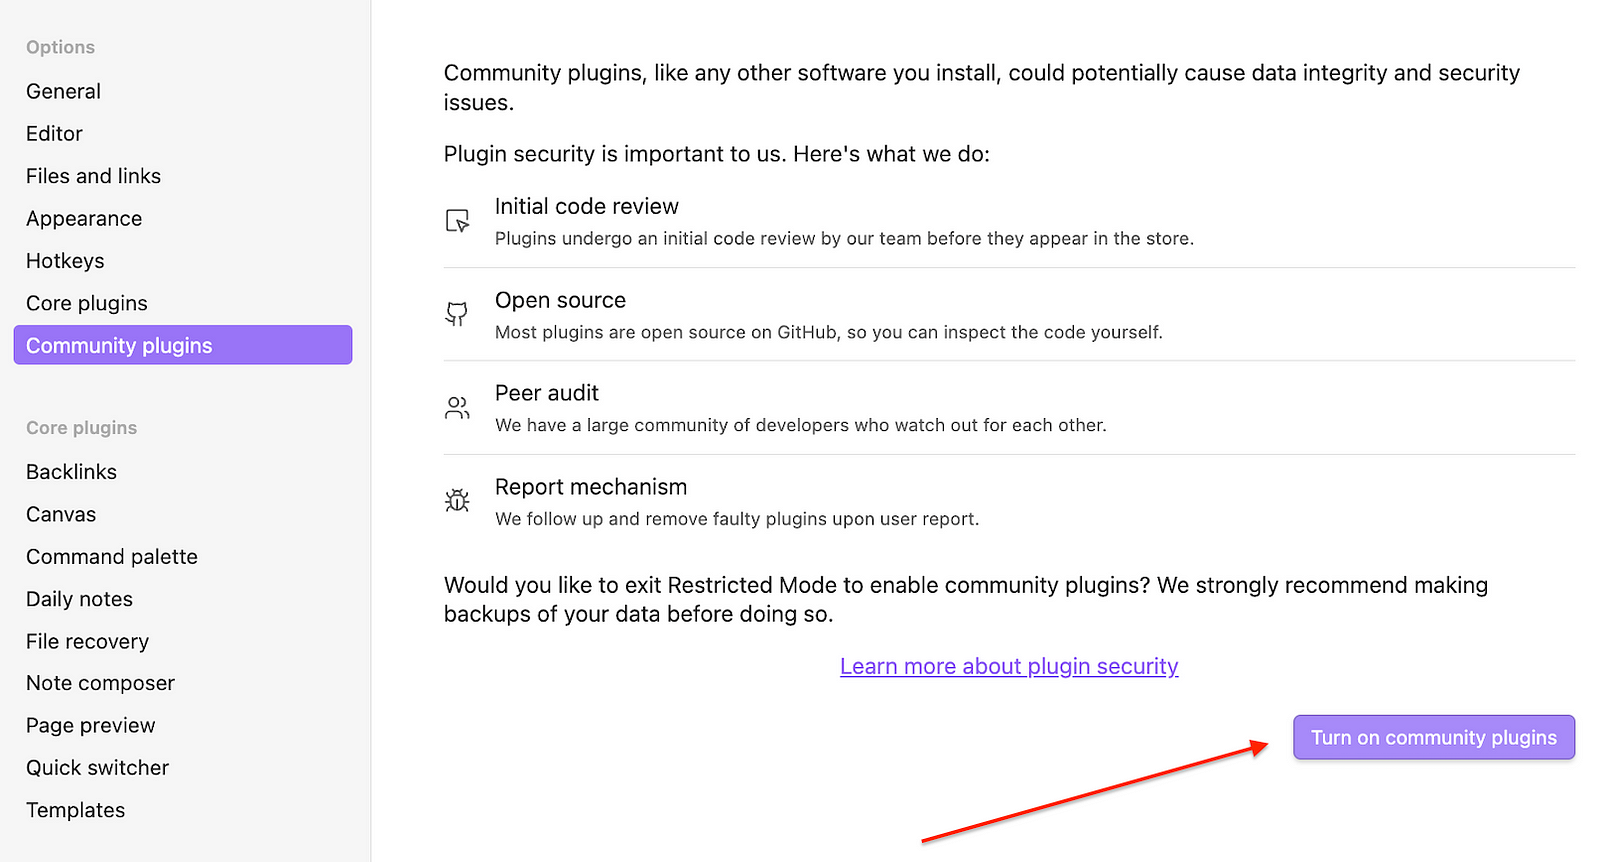
Once enabled, you can click Browse to find community plugins. Simply search for “Smart Second Brain” and install the plugin. You can also find it by pasting this link into your browser: obsidian://show-plugin?id=smart-second-brain.
It looks like this:
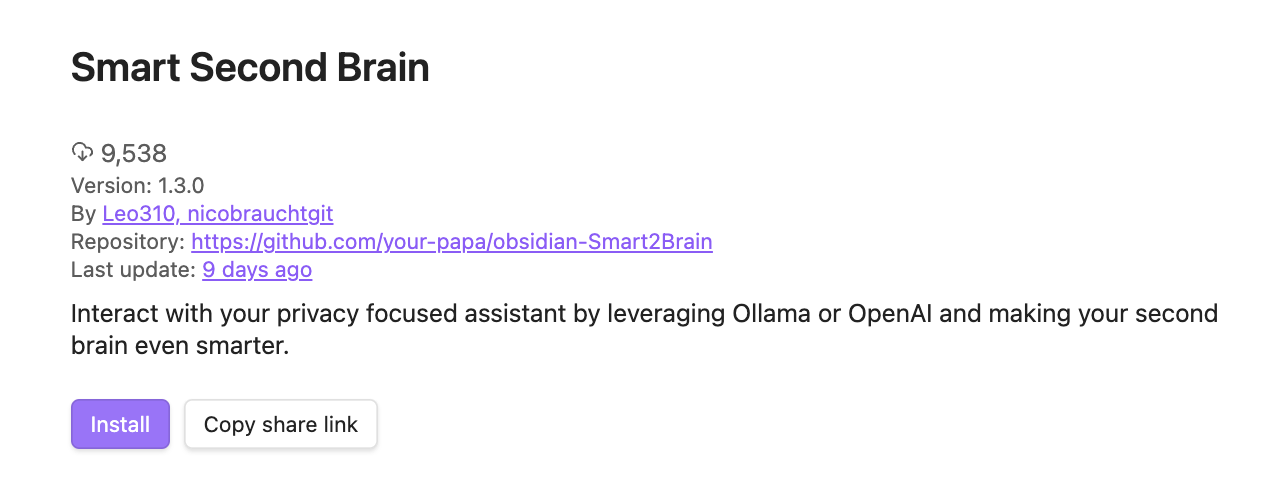
Just hit install, click enable, and click on options afterwards. In the options we can now configure the plugin to make it use either a locally running language model or a Third-Party Service like OpenAI.
Configure Locale Language Models
In the Smart Second Brain settings, you can set different options like autostarting the plugin or excluding files, which makes sense for large folders which are not relevant for your AI:
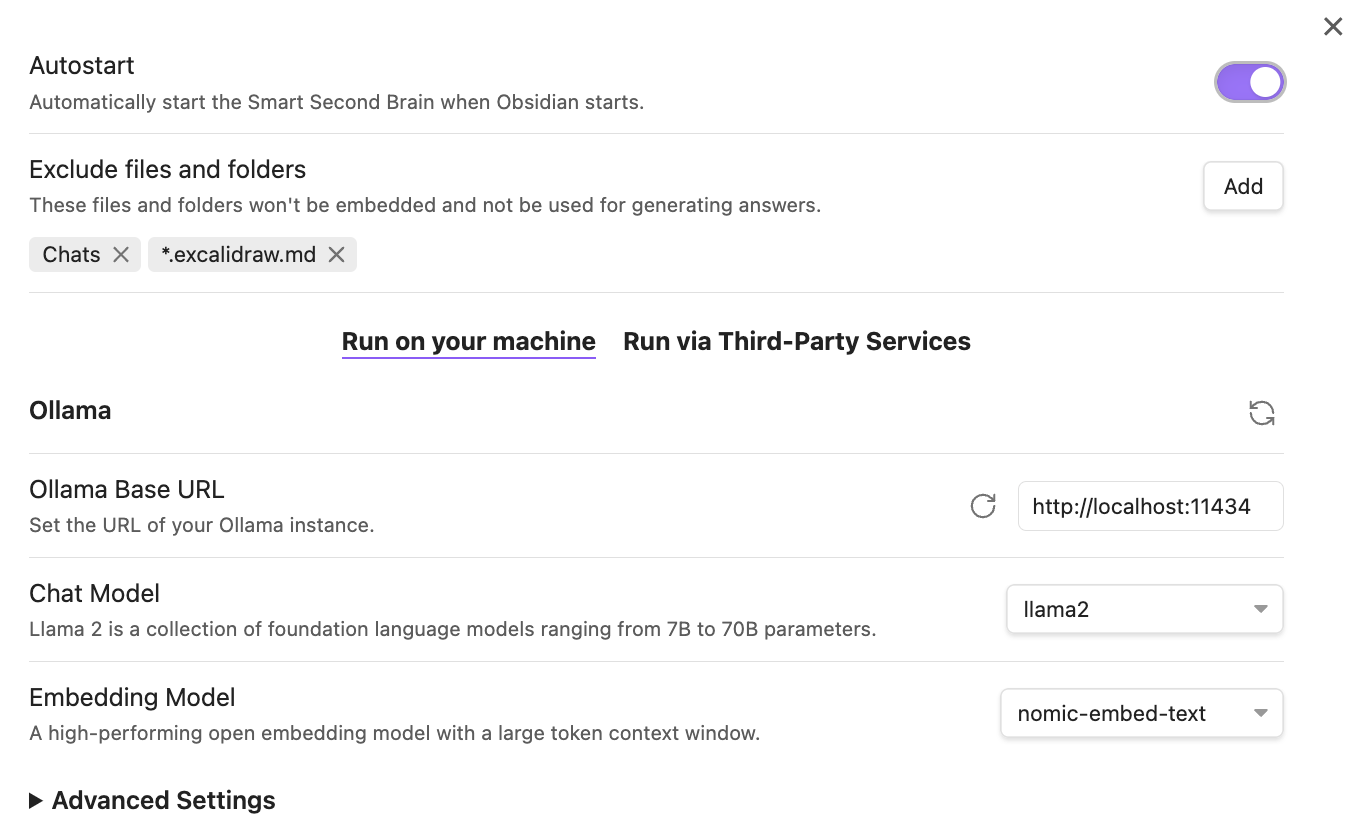
You can see that the Ollama Base URL is already pre-configured and that you need to select an embedding model. The pre-configured nomic-embed-text should work just fine.
Configure ChatGPT
If you prefer using ChatGPT, just click on third-party services and enter your OpenAI key. If your key is correct, you should be able to select from a language model and an embedding model:
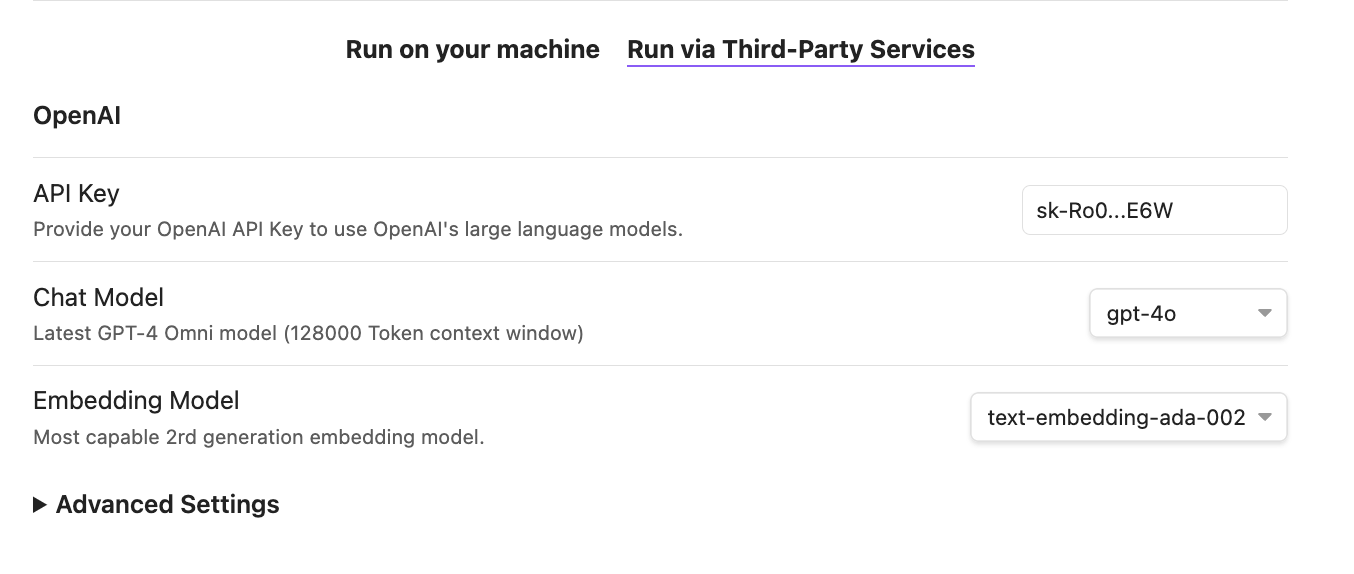
You can also configure some advanced settings, but let’s skip this for now.
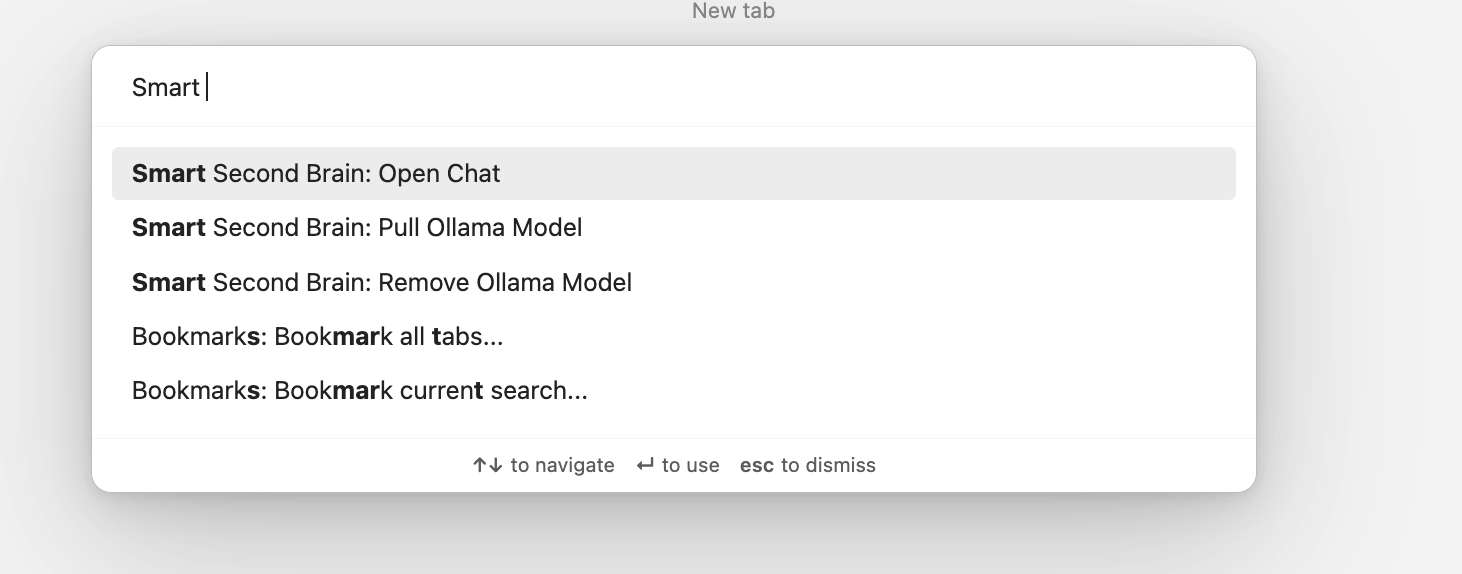
3. Start Chatting With Your Notes
To continue, close the settings and open the command palette for Obsidian (Mac CMD + P, Windows/Linux CTRL + P). Then, type ‘Smart Second Brain’ and choose Open Chat:
You should now see the Smart Second Brain sidebar:
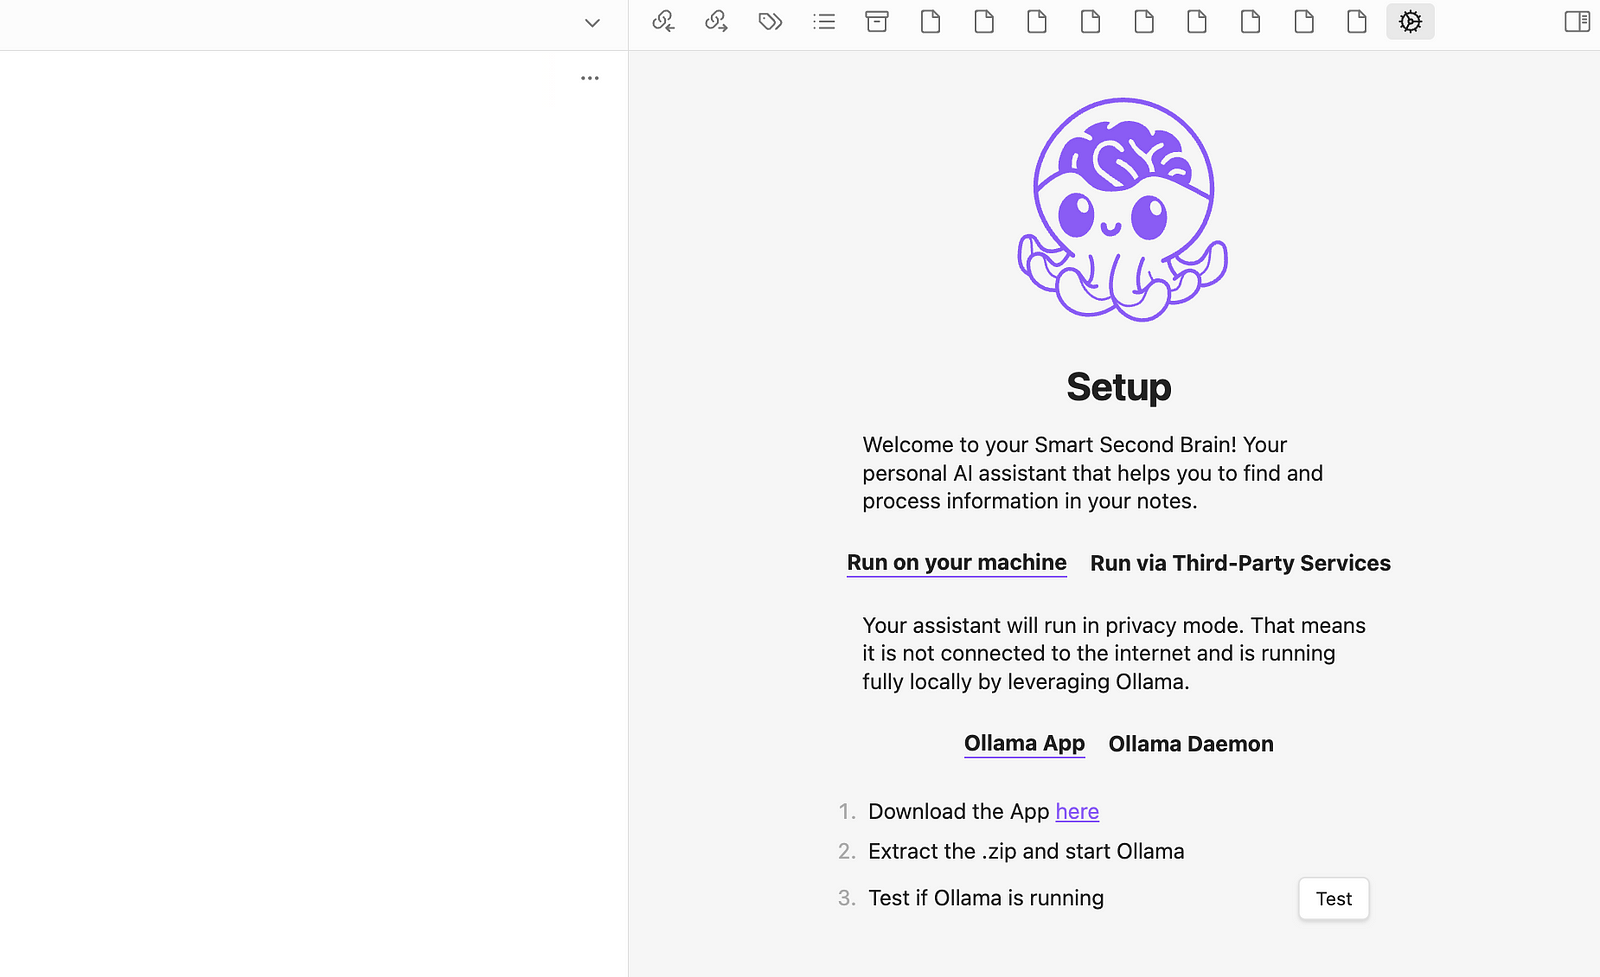
If you like to run it locally using Ollama, click on “Test” to check whether Ollama is configured correctly.
If so, you will see a code snippet, which you need to paste into your terminal to set the Ollama origins.
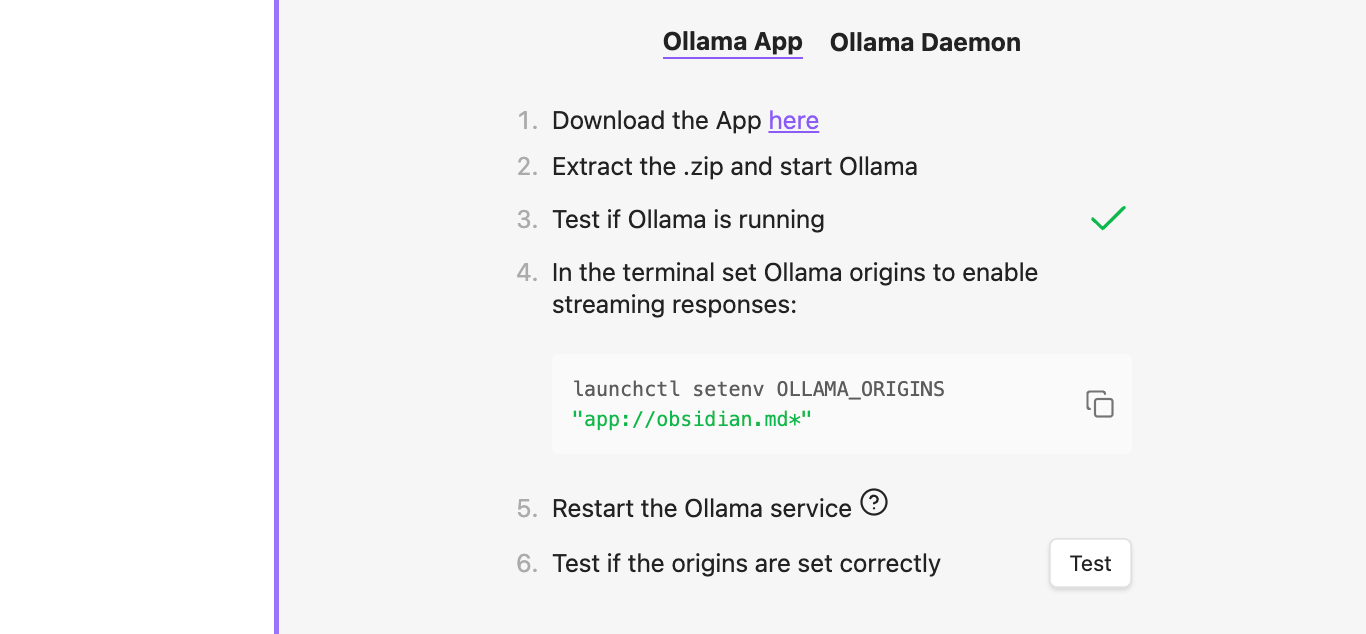
Simply copy the command and paste it to your terminal. Then restart the Ollama service by clicking the Ollama menu bar and clicking quit.
Then, click Test to check if everything works correctly. If so, you should see an option to install an Embedding model:
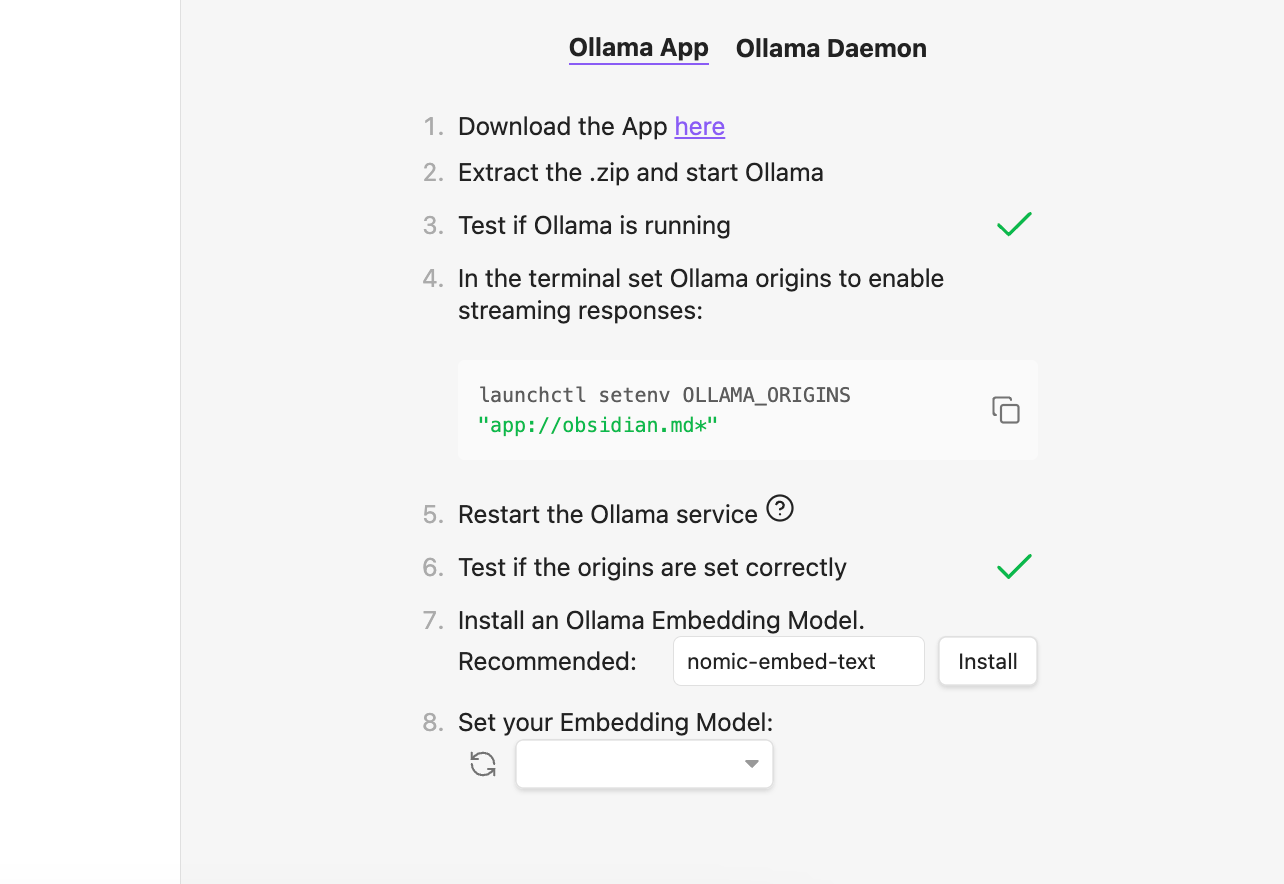
Just install it and click Start your Smart Second Brain afterward:

You should now see a chat window prompting you to install a language model. By default, the one you chose in the settings is set.
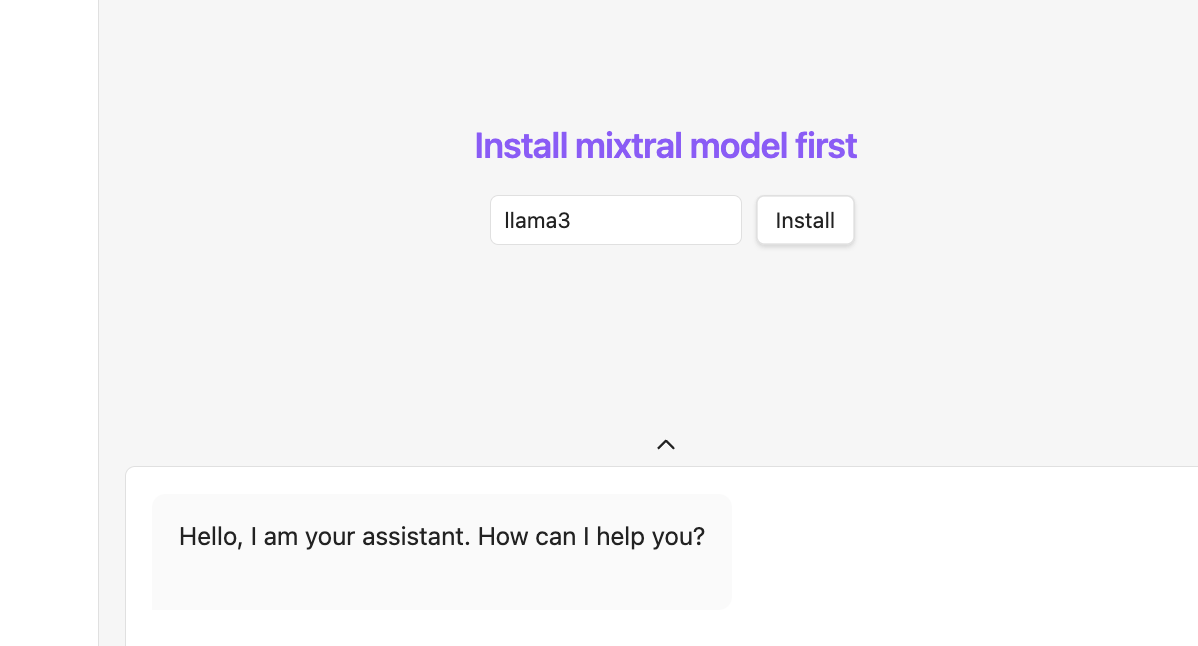
Just hit install and wait for the download to complete. This might take some time as LLMs are often quite large.
Once finished, we need to reinitialize the Second Brain:
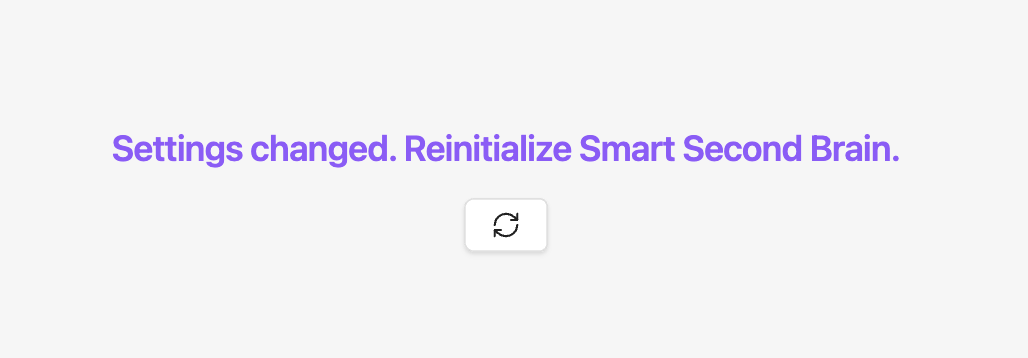
The plugin will now index your vault which takes some time depending on the amount of notes you have in your vault.

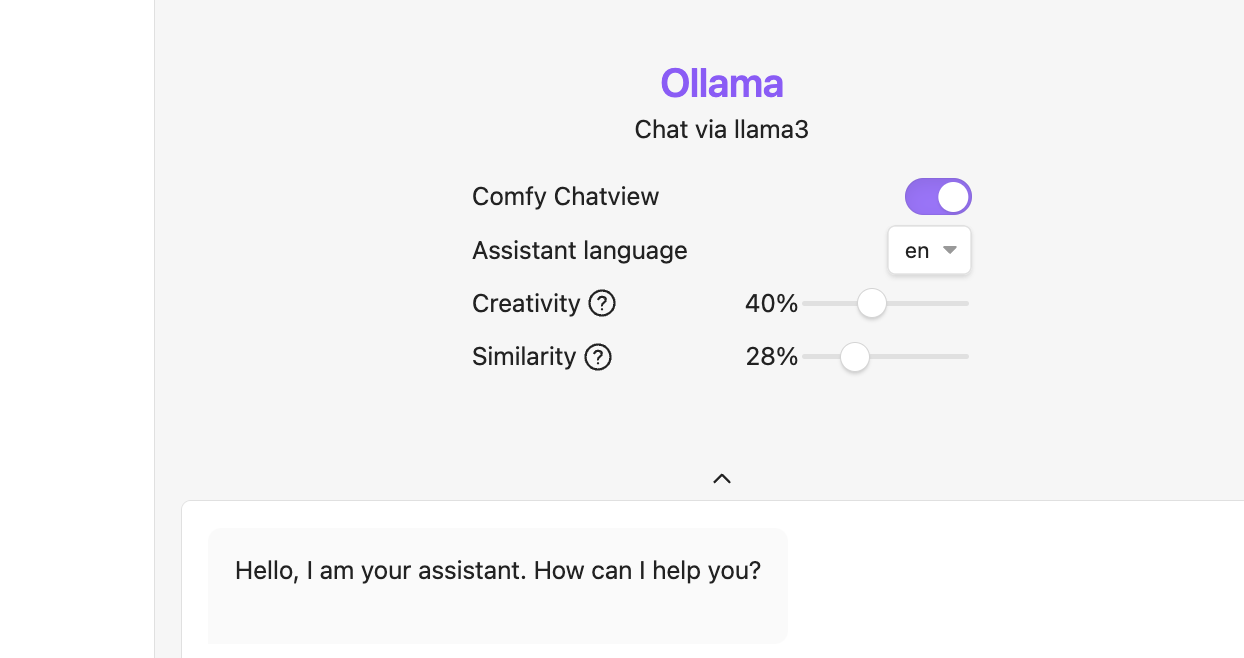
Start Chatting With Your Notes
When finished, we can finally start chatting with our notes and we can also configure two settings:
- Creativity: Adjusts the level of originality in the model’s outputs to suit your preference.
- Similarity: How similar the retrieved documents should be to the user query.
You have to play around with it a bit and adjust it to your needs. For me, I have found that a ratio of 40% creativity and 28% similarity works best.
Keep in mind, there’s no right or wrong here. It always depends on the situation.
On the one hand, when writing a poem, boosting creativity is likely the way to go. On the other hand, when evaluating a legal document, creativity isn’t what you need.
Now, let’s see how well the chat works by asking a question about my notes:
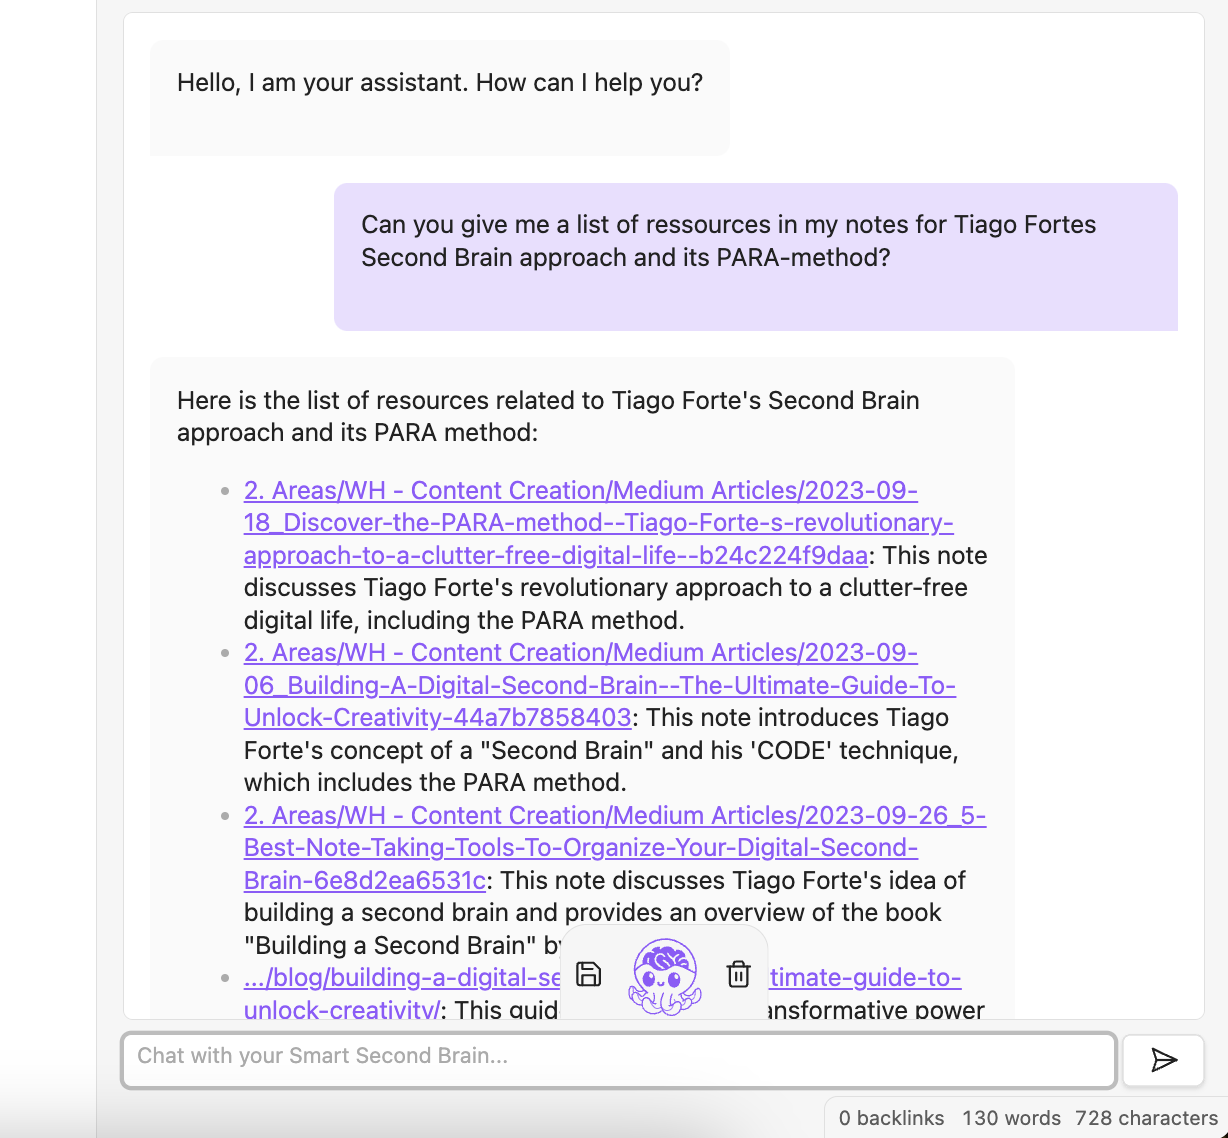
You can see that the plugin searches my notes and even links back to them in its answers.
I think that’s really cool, especially because it can even work with confidential local files since it doesn’t need to connect to external services. You could even use it offline.
Thanks for reading!
Want to learn more about how I scaled my Chrome Extension to 100k+ users as a solopreneur? Subscribe to my stories or follow me on LinkedIn and Twitter.
