# Building A Beautiful Link Preview With Web Components

> A thumbnail image of your website can be essential to attract new users. In this article we will build a beautiful link preview with Web Components.

- Author: Marius Bongarts
- Published: 2022-08-29
- Updated: 2026-04-08
- Tags: Web Components, Web Highlights, Product Design
- Reading time: 4 min
- URL: https://web-highlights.com/blog/building-a-beautiful-link-preview-with-web-components/

---

Recently, I improved the design of the [Web Highlights](https://web-highlights.com/) app's dashboard by showing a link preview for each highlighted page. Here is what the new design looks like:
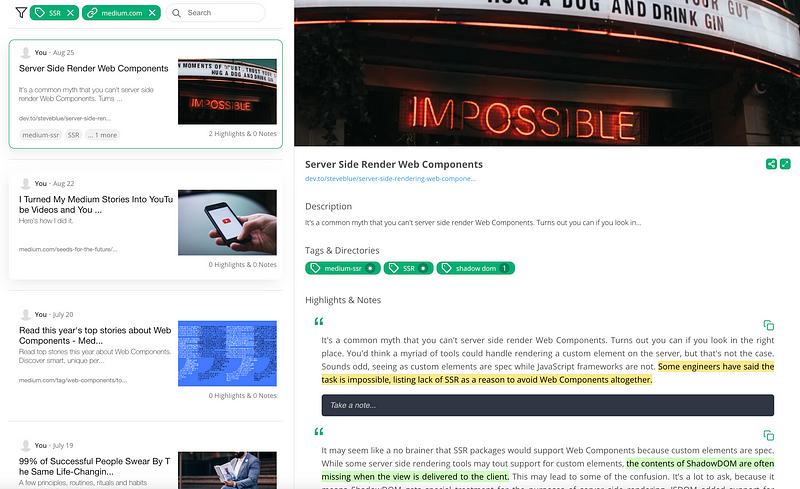
![Web Highlights dashboard](https://cdn-images-1.medium.com/max/800/1*1PKEfbejvmunHMQk3rCvUQ.png)

*Web Highlights dashboard*

In this article, I want to share how to create such a link preview component and make web pages appear with a thumbnail.

If you follow my articles, you will probably know that I am a big fan of **Web Components** . So, of course, I built this component with Web Components as well.

For several reasons:

-   I can use the component in the Vue.js web app as well as in the Web Component-based [Chrome Extension](https://chrome.google.com/webstore/detail/web-highlights-pdf-web-hi/hldjnlbobkdkghfidgoecgmklcemanhm) .
-   The architecture is better encapsulated
-   Anyone can reuse the component

Suppose you are not yet convinced. Embedding the application is as easy as including these few lines of code in your web application:

```html
  <webhighlights-link-preview url="https://web-highlights.com/">
  </webhighlights-link-preview>
  <script src="https://cdn.jsdelivr.net/gh/Web-Highlights/webhighlights-link-preview/dist/main.js" type="module">
```

[View this code on GitHub Gist](https://gist.github.com/MariusBongarts/21e614d00a39ae3f2eb2bd182643f158)

You can find a [demo here](https://web-highlights.github.io/webhighlights-link-preview/) . Here is also a [CodePen](https://codepen.io/marius2502/pen/zYWyPxe) showing how easy it is to use the link preview anywhere:

[Embedded content](https://codepen.io/marius2502/embed/preview/zYWyPxe?default-tabs=js%2Cresult&height=300&host=https%3A%2F%2Fcodepen.io&slug-hash=zYWyPxe)

*CodePen*

---

### Frontend

For the component's design, I followed a plain one as Medium does. The preview card contains a title, description, link, and preview image. Here is what the thumbnail preview component looks like:

![Link Preview Component](https://cdn-images-1.medium.com/max/800/1*f6To7VWIueY7Rtcrg05S6A.png)

*Link Preview Component*

Furthermore, the component shows some **loading** indicators when fetching the open graph data from our API, which we will come to later.

![Link Preview Component loading state](https://cdn-images-1.medium.com/max/800/1*5_drQ4Yo8J6Yf5GWte_4yQ.gif)

*Link Preview Component loading state*

I will not go into detail about the CSS implementation in this article. But you can find the [Github repository here](https://github.com/Web-Highlights/webhighlights-link-preview) . Feel free to check it out.

#### Building the Web Component

To build this web component I created the custom element `webhighlights-link-preview` . To make development easier, I am using the Lit library from Google.

We create our custom element by using Lit's `customElement` decorator and provide some reactive properties to make our element customizable by the client:

```ts
@customElement("webhighlights-link-preview")
class LinkPreview extends LitElement {
  @property() url!: string;
  @property() api: string = env.api;
  @property() titleFallback!: string;
  @property() descriptionFallback!: string;
  @property() imageFallback!: string;
```

[View this code on GitHub Gist](https://gist.github.com/MariusBongarts/0e6fa32c6d963605b696e96e39039339)

A client must provide a `url` for which we will fetch the open graph data from our API. Furthermore, one can provide an alternative `apiUrl` URL if you want to use a different API.

Not every website provides open graph meta data tags so that a client can provide some fallback data in case we can not find a **title** , **description** , or **image** for the given URL.

Furthermore, we need a reactive property that stores the fetched metadata for the corresponding URL:

```ts
@property() metaData: OpenGraphMetaData | undefined;
```

[View this code on GitHub Gist](https://gist.github.com/MariusBongarts/e07699bf3f48bf19b5e175f93b7e92b3)

The `OpenGraphMetaData` interface defines the object we expect to get back from the API. It looks like this:

```ts
export interface OpenGraphMetaData {
  title?: string;
  image?: OpenGraphImage;
  description?: string;
  url?: string;
  type?: string;
  author?: string;
  favicon?: string;
}
```

[View this code on GitHub Gist](https://gist.github.com/MariusBongarts/60a04bf62b39c3189e4f291027fe2d46)

So, if you wanted to create your own API, you would need to make your server response adapt to this `OpenGraphMetaData` interface and provide the URL of the endpoint within the components `apiUrl` property.

Furthermore, we need to know whether the component should show the text-loading indicators. In this case, we want to show it as long as our `metaData` property is `undefined` . To check this in the template, we create a simple getter:

```ts
  get loading() {
    return typeof this.metaData === "undefined";
  }
```

[View this code on GitHub Gist](https://gist.github.com/MariusBongarts/f816704ae0915812adbfde529b2bdde4)

Now, in the template, we can conditionally add some CSS classes to make our component show a loading state depending on whether the `metaData` is still being fetched from the server or has already been loaded:

```ts
render() {
  return html`
    <div class="link-preview-meta-info-container ${this.loadingClass}">
      <header class="link-preview-meta-info-header ${this.loadingClass}">
        ${this.title}
      </header>
      <main class="link-preview-meta-info-description ${this.loadingClass}">
        <span>${this.description}</span>
      </main>
      <footer class="link-preview-meta-info-footer ${this.loadingClass}">
        <span class="link-preview-meta-info-footer-url"
          >${this.previewUrl}</span
        >
      </footer>
    </div>
    ${this.loading
      ? html` <div class="link-preview-image ${this.loadingClass}"></div> `
      : html`
          <img
            class="link-preview-image"
            src="${this.imageSrc}"
            alt="Link preview image"
          />
        `}
  `;
}
```

[View this code on GitHub Gist](https://gist.github.com/MariusBongarts/effdb9d6219156db7ba3b0957283e227)

---

### **Fetching Open Graph Data**

To get all the needed data for our preview, we must somehow fetch the Open Graph metadata tags from the corresponding URLs. If you are not familiar with the Open Graph protocol, you should check out this article first:

> [**Make Your Website Have a Beautiful Thumbnail Link Preview**](https://web-highlights.com/blog/turn-your-website-into-a-beautiful-thumbnail-link-preview/) — Understand and apply the Open Graph protocol to your website. (Marius Bongarts)

There is the possibility to get the necessary data using APIs like OpenGraph.io. Using APIs like this, we wouldn't need to create a server to get the data. Unfortunately, most of those APIs have a limited amount of requests. OpenGraph.io, e.g., limits it to 100 requests.

As I don't want to pay anything to get Open Graph Data, I created a simple Netlify function that fetches Open Graph data using the open-source **openGraphScraper** library. This library is a simple node module for scraping Open Graph for any website.

In production, I am using the normal server environment for my [Web Highlights](https://web-highlights.com/) application as I also wanted to provide some server-side caching to decrease the loading time. But, for this example, a simple Netlify function should be fine.

We can get the Open Graph data for any URL by importing the `ogs` object from the library:

```ts
import ogs from "open-graph-scraper";
```

[View this code on GitHub Gist](https://gist.github.com/MariusBongarts/695cf323140ec4c23b4094afbf3f8933)

And then fetch the data like this:

```ts
const { error, result } = await ogs({ url: params.url, retry: 0 });
if (error || !result?.success) {
  return {
    statusCode: 500,
    body: JSON.stringify(error),
    headers,
  };
}
```

[View this code on GitHub Gist](https://gist.github.com/MariusBongarts/3b954c787ac9031f72e21c2a6c288f3e)

Afterward, we adapt the received `SuccessResult` interface to our expected `OpenGrapgMetaData` interface by using an adapter function:

```ts
export function mapOpenGraphResultToMetaData(
  result: OpenGraphSuccessResult
): OpenGraphMetaData {
  return {
    title: result.ogTitle,
    type: result.ogType,
    description: result.ogDescription,
    author: result.author,
    url: result.ogUrl,
    image: mapImage(result),
    favicon: result.favicon,
  };
}
```

[View this code on GitHub Gist](https://gist.github.com/MariusBongarts/ff5ad6734237c0e6e2f54cbeae12ed2d)

Here is what the Netlify handler looks like:

```ts
const handler: Handler = async (event, context) => {
  try {
    const params = event.queryStringParameters as unknown as QueryParams;
    validateParams(params);
    const { error, result } = await ogs({ url: params.url, retry: 0 });
    if (error || !result?.success) {
      return {
        statusCode: 500,
        body: JSON.stringify(error),
        headers,
      };
    }
    const metaData: OpenGraphMetaData = mapOpenGraphResultToMetaData(result);
    return {
      statusCode: 200,
      body: JSON.stringify(metaData),
      headers,
    };
  } catch (error) {
    return {
      statusCode: 400,
      body: JSON.stringify(error),
      headers,
    };
  }
};

export { handler };
```

[View this code on GitHub Gist](https://gist.github.com/MariusBongarts/d59a998baf73af25f5703897fa5b89f2)

Now, in our frontend, we can get the needed metadata by fetching it from our endpoint:

```ts
fetchOpenGraphMetaData() {
  const encodedUrl = encodeURIComponent(this.url);
  const url = `${this.apiUrl}?url=${encodedUrl}`;
  fetch(url)
    .then(async (data) => {
      try {
        this.metaData = (await data.json()) as OpenGraphMetaData;
      } catch (error) {
        this.metaData = {};
      }
    })
    .catch(() => (this.metaData = {}));
}
```

[View this code on GitHub Gist](https://gist.github.com/MariusBongarts/3e1d3b593d989ee52c47bf273636d58b)

### Final Thoughts

Thanks for reading this article. I hope you could follow along to build your own link-preview component or reuse the one we created here. Notice that I can not guarantee that the provided Netlifiy API will be available forever. So, if you are planning to use this component in production, make sure to provide your own endpoint.

Get in touch with me via [LinkedIn](https://www.linkedin.com/in/marius-bongarts-6b3638171/) or follow me on [Twitter](https://twitter.com/MariusBongarts) .
